
For over-the-road truck drivers, a power inverter isn’t just a convenience it’s a game-changer that transforms your rig into a mobile living space.
Whether you need to charge your laptop, run a mini-fridge, power a CPAP machine for better sleep, or keep your smartphone and tablet charged during long hauls, a properly installed power inverter makes it all possible.
However, installing an inverter in a semi truck is fundamentally different from plugging one into a car’s cigarette lighter. Truck batteries are larger, wiring needs to be more durable to handle constant vibration, and safety is absolutely non-negotiable.
In this comprehensive guide, I’ll walk you through everything you need to know from selecting the right inverter to the final testing and ongoing maintenance. Whether you’re a first-time installer or looking to upgrade an existing setup, this guide has you covered.
Why Install a Power Inverter in Your Semi Truck?
Before diving into the installation process, let’s understand why this upgrade matters. A properly installed inverter converts your truck’s DC (direct current) battery power into AC (alternating current) the same type of electricity you use in your home. This means you can:
- Run household appliances: Microwaves, mini-fridges, coffee makers, and TVs
- Charge sensitive electronics: Laptops, smartphones, tablets, and cameras
- Power medical equipment: CPAP machines and other essential devices
- Use power tools: Drills, saws, and other job-site equipment
Beyond convenience, a correctly installed inverter is critical for:
- Safety: Improper wiring is a leading cause of electrical fires in commercial vehicles
- Fuel efficiency: Running appliances off an inverter-powered battery bank significantly reduces engine idling, translating to substantial fuel savings
- Compliance: Some fleet operations have specific requirements for auxiliary power installations
Step 1: Choose the Right Inverter for Your Semi Truck
The single most important decision you’ll make is selecting the right inverter for your specific truck and needs. Here’s what you need to consider:
Voltage Compatibility
Most heavy-duty semi trucks use 12V electrical systems, though some older or specialized models may use 24V. Light-duty pickup trucks like the Ford F-150 or Chevy Silverado also use 12V. Critical warning: Using a 12V inverter on a 24V system will destroy it instantly. Always verify your truck’s voltage before purchasing.
Power Rating (Wattage)
Calculate the total wattage of all devices you plan to run simultaneously. For example:
- Mini-fridge: 300W
- Laptop charger: 60W
- Phone charger: 10W
- Total: 370W
The golden rule: Always leave a 20-30% buffer to avoid overloading. If your total is 370W, choose at least a 500W inverter. For motor-driven devices like microwaves and refrigerators, factor in surge wattage these can momentarily draw 2-3 times their continuous rating when starting up.
Waveform Type: Pure Sine Wave vs. Modified Sine Wave
This is one of the most important and most misunderstood decisions you’ll make:
| Feature | Pure Sine Wave (PSW) | Modified Sine Wave (MSW) |
|---|---|---|
| Power quality | Identical to household electricity | Approximates sine wave with distortion |
| Cost | Higher | More affordable |
| Best for | Sensitive electronics, medical equipment, motor-driven appliances | Resistive loads: heaters, lights, basic tools |
| Risk | None | Can damage sensitive electronics or cause inefficient operation |
My recommendation: If you plan to run laptops, CPAP machines, or any device with a clock or complex circuitry, invest in a pure sine wave inverter. The extra cost is well worth protecting your expensive equipment.
Truck-Friendly Design Features
Look for inverters with:
- Vibration-resistant casings (trucks shake more than cars!)
- Built-in protections: Overload, short-circuit, and low-voltage cutoff to preserve your battery
- Remote control capability: A wired remote lets you monitor status and turn the inverter on/off without accessing the main unit
- Ignition-on feature: Prevents battery drain when the engine isn’t running
Step 2: Gather Your Tools and Materials
Before you start any installation, make sure you have everything you need. Nothing is more frustrating than realizing you’re missing a critical component halfway through.
Essential Tools and Supplies
| Item | Purpose |
|---|---|
| Power inverter (with mounting brackets if included) | The main unit |
| 4-gauge or 6-gauge copper wire (check your manual) | Carries current from battery to inverter |
| Wire cutters/strippers | Preparing cable ends |
| Crimping tool | Attaching ring terminals |
| Ring terminals (match battery terminal bolts) | Secure connections |
| Fuse holder + inline fuse (rated for 125% of max current) | Circuit protection |
| Electrical tape + heat-shrink tubing | Insulating connections |
| Drill + drill bits | Mounting the inverter |
| Screwdrivers (flathead and Phillips) | Various fastening tasks |
| Zip ties | Securing wires along the frame |
| Gloves + safety glasses | Personal protection |
Wire Gauge Selection
This is critical: Using the wrong wire gauge causes voltage drop, overheating, and potential fire hazards. Both positive and negative cables must be the same gauge.
Here’s a quick reference for 12V systems (the most common in semi trucks):
| Inverter Size | Max Amps | 0-3 ft run | 3-6 ft run |
|---|---|---|---|
| 400W | 33A | 8 AWG | 6 AWG |
| 600W | 50A | 6 AWG | 4 AWG |
| 1000W | 83A | 4 AWG | 2 AWG |
| 1500W | 125A | 2 AWG | 1/0 AWG |
| 2000W | 167A | 1/0 AWG | 2/0 AWG |
| 3000W | 250A | 4/0 AWG | 350 MCM |
Important: Cable run length is the total distance of both positive and negative cables combined. If your battery is 2 feet from the inverter, the total run is 4 feet (2 ft positive + 2 ft negative). Always measure the actual routed path, not straight-line distance.
Step 3: Choose Your Battery Setup
This is where semi truck installations differ significantly from passenger vehicles. You have two primary options:
Option A: Starter Battery (Engine-Only Use)
Connecting directly to your truck’s starter battery is simpler but comes with a major limitation: you must keep the engine running when using the inverter. If you forget and run the inverter with the engine off, you risk depleting your starter battery and getting stranded.
Option B: Deep-Cycle Leisure Battery (Recommended)
Most semi trucks already have deep-cycle leisure batteries separate from the starter battery. This is the strongly recommended approach because:
- You won’t risk depleting your starter battery
- You can use the inverter without running the engine
- Many semi trucks include extra space for additional batteries
Pro tip: If you want the best of both worlds, install a battery isolator that allows the alternator to charge both batteries but only lets the inverter draw from the secondary battery. This gives you peace of mind and maximum flexibility.
Step 4: Find the Optimal Mounting Location
Where you mount your inverter matters a lot. Trucks have limited space, and you need to avoid areas that are hot, wet, or prone to damage.
Good Locations
- Under the driver or passenger seat (if there’s space)
- On the side of the center console
- In the truck’s storage compartment (if well-ventilated)
- Behind the rear seat
Bad Locations (AVOID!)
- Near the engine: Too hot!
- Above the battery: Risk of acid spills
- Where wires can be crushed: By seats or cargo
- In the engine bay: Should be placed inside the vehicle
Critical Mounting Requirements
- Ventilation: Leave at least 4-6 inches of space around the inverter for airflow. Truck inverters run hot, and poor ventilation causes overheating.
- Proximity to battery: Mount the inverter as close as possible to the battery to minimize DC cable length, which reduces voltage drop and improves efficiency. However, do not install it in the same compartment as the batteries.
- Secure mounting: Work vehicles experience vibration, jolts, and rough conditions. Mount your inverter firmly to a stable surface to protect internal components. Use the included mounting brackets with screws drill small pilot holes first to avoid splitting plastic or metal.
- Dry location: If you drive in rain or snow, ensure the inverter is in a waterproof spot water and electricity are a deadly combination.
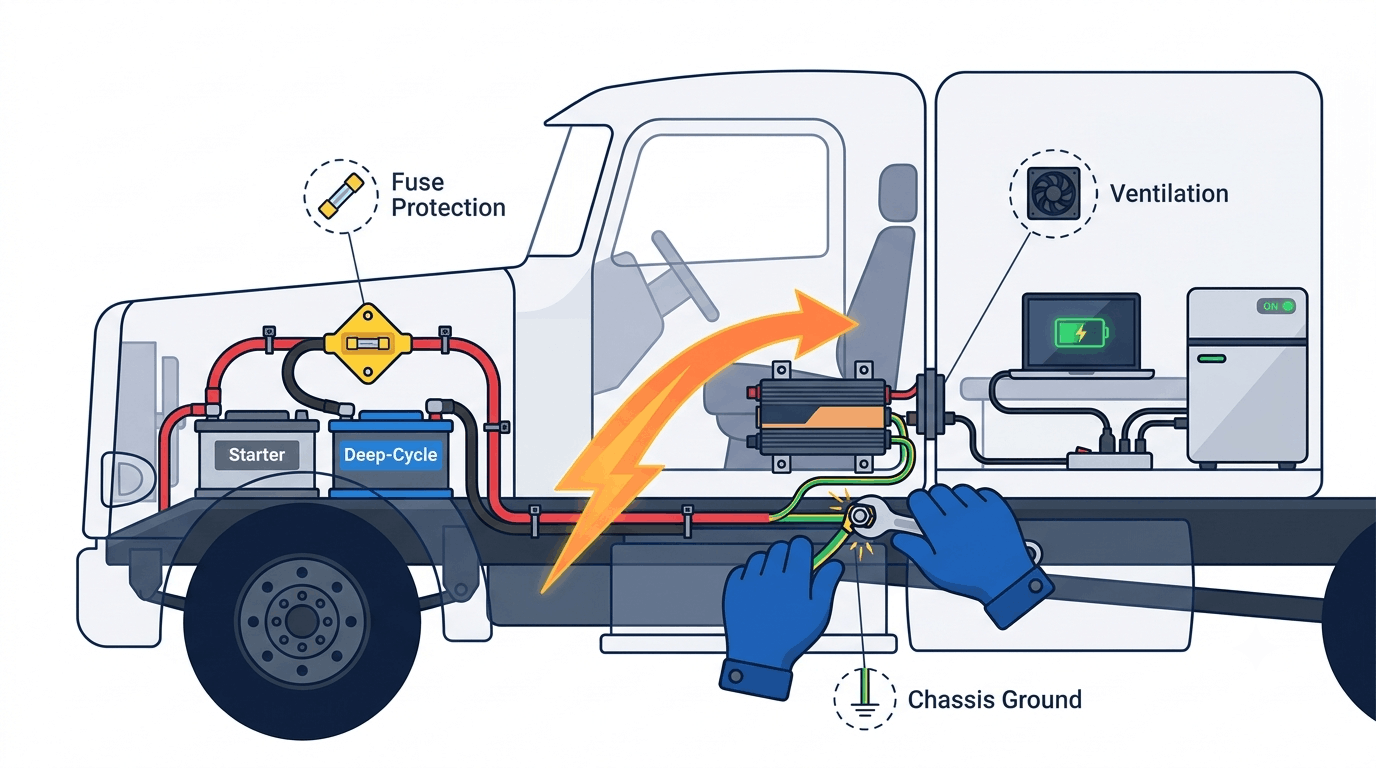
Step 5: Wire the Inverter to the Battery (The Critical Step!)
This is where most mistakes happen. Follow these sub-steps precisely to avoid short-circuits, battery damage, or worse a fire.
Sub-Step 5.1: Disconnect the Truck Battery
Safety first! Turn off your truck’s engine, then disconnect the negative (-) battery terminal using a wrench. This prevents electrical shocks or sparks while you work.
Sub-Step 5.2: Prepare the Positive (+) Wire
- Cut a length of positive wire that reaches from the battery to the inverter add 1-2 feet extra to avoid stretching.
- Strip ½ inch of insulation from both ends of the wire.
- Crimp a ring terminal onto one end (this connects to the battery’s positive terminal).
- On the other end, attach the inline fuse holder. The fuse must go between the battery and the inverter this stops excessive current if there’s a short.
Fuse sizing: The fuse should be rated for 125% of your inverter’s maximum current. For example, a 500W/12V inverter drawing approximately 42A needs roughly a 50A fuse.
Sub-Step 5.3: Prepare the Negative (-) Wire
- Cut a negative wire of the same length and gauge as the positive wire.
- Strip ½ inch of insulation from both ends.
- Crimp a ring terminal onto one end (for the battery’s negative terminal) and leave the other end bare (to connect to the inverter’s negative port).
Sub-Step 5.4: Connect Wires to the Battery
- Attach the positive wire’s ring terminal to the battery’s positive (+) terminal. Tighten the bolt with a wrench loose connections cause heat and sparks.
- Slide the fuse into the fuse holder after connecting the wire to avoid sparks during setup.
- Attach the negative wire’s ring terminal to the battery’s negative (-) terminal. Tighten the bolt securely.
For 24V systems: The same principles apply, but current draw is halved at the same wattage, allowing for smaller, less expensive cables.
Sub-Step 5.5: Connect Wires to the Inverter
- Run the positive and negative wires from the battery to the inverter.
- Use zip ties to secure wires along the truck’s frame keep them away from moving parts like fan belts and hot surfaces like the exhaust.
- Plug the positive wire (from the fuse holder) into the inverter’s positive (+) port. Screw the terminal tight.
- Plug the negative wire into the inverter’s negative (-) port. Tighten the terminal no loose wires allowed!
Sub-Step 5.6: Chassis Ground (Don’t Skip This!)
The inverter housing must be connected to the chassis or to a metallic panel connected to the chassis. This grounding procedure conforms to most electrical codes and is essential for safety. Do not operate the inverter if the ground screw is not properly connected to the chassis it may result in electrical shock hazard.
To ground properly:
- Find a clean, bare metal spot on the truck frame near the inverter.
- Drill a hole and attach a properly sized ground cable with a ring terminal.
- Connect the other end to the inverter’s chassis ground terminal.
Step 6: Secure the Inverter
Once the wires are connected, mount the inverter to your chosen spot to prevent it from sliding around while driving. Vibration damages loose inverters.
- If the inverter has mounting brackets, use screws to attach the brackets to the truck’s interior.
- Place the inverter on the brackets and screw it in make sure it’s level and won’t shift when you hit bumps.
- Use electrical tape or heat-shrink tubing to cover any exposed wire ends this prevents short-circuits if wires rub against metal.
Step 7: Test the Inverter (And Check for Issues)
Now it’s time to make sure everything works. Follow these tests to stay safe:
- Turn on the truck: Start the engine to avoid draining the battery (inverters draw power even when idle).
- Switch on the inverter: Press the power button a green LED light means it’s working; red means a problem like overloading.
- Plug in a small device: Connect a phone charger or laptop to test. If it charges, the inverter is working!
- Check for heat or sparks: Feel the wires and inverter they should be cool (warm is okay, but hot means a loose connection).
⚠️ If you see sparks or smell burning plastic, turn off the inverter immediately and check the wiring.
Step 8: Install a Remote Control Panel (Highly Recommended)
A wired remote control panel makes it easy to monitor status, turn the inverter on/off, and check alarms without accessing the main unit. This is especially valuable in a semi truck where the inverter may be mounted under a seat or in a hard-to-reach compartment.
Installation is typically straightforward:
- Mount the remote box on a flat surface using the provided screws.
- Connect the remote control cable between the remote box and the inverter.
Truck-Specific Safety Rules to Follow
Installing an inverter in a semi truck comes with unique risks. Here’s how to avoid trouble:
Never Run the Inverter with the Engine Off for Hours: It will drain your battery, leaving you stranded. Use it only when the engine is running or invest in a second deep-cycle battery for the inverter.
Avoid Overloading: Truck inverters are tempting to use for big devices like space heaters, but a 1500W heater will drain a 12V battery in about 30 minutes. Stick to low-wattage gear or ensure you have adequate battery capacity.
Inspect Wires Monthly: Truck vibration loosens connections. Every few weeks, check the wires, fuses, and terminals for damage or wear.
Keep It Dry: If you drive in rain or snow, ensure the inverter is in a waterproof spot.
Use Properly Rated Fuses and Cables: Undersized cables can overheat and create fire hazards. Protect the system with a properly rated fuse or breaker near the battery connection.
Common Problems and Troubleshooting
| Problem | Likely Cause | Solution |
|---|---|---|
| Red light / no power | Overload or short circuit | Check connected devices; reduce load |
| Inverter won’t turn on | Blown fuse | Replace fuse with correct rating |
| Devices run poorly | Modified sine wave for sensitive electronics | Upgrade to pure sine wave inverter |
| Hot wires | Loose connection or undersized cable | Tighten connections; upgrade wire gauge |
| Battery drains quickly | Engine off while using inverter | Run engine; add second battery |
| Blinking red light | Low voltage cutoff | Check battery charge; start engine |
If you run into issues, double-check the fuse and wire connections first those are the most common problems.
Final Thoughts: Is Professional Installation Worth It?
A properly installed inverter turns your truck into a mobile power hub, making long drives more comfortable and productive. By following these steps choosing the right inverter, wiring carefully, and prioritizing safety you’ll avoid accidents and keep your truck’s electrical system intact.
However: If you’re not confident in your wiring skills, ask a professional truck mechanic to help safety is worth the extra effort. Electrical mistakes can be costly, dangerous, or even fatal. There’s no shame in getting expert help.
Frequently Asked Questions
Can I install a power inverter myself?
What size inverter do I need for a semi truck?
Can I run a microwave in my semi truck?
Will an inverter drain my truck battery?
How long will a truck battery run an inverter?
Ready to stop dreaming and start driving?
Fill out the form and a Remms recruiter will reach out within one business day. No spam, no pressure — just real results.
Submit Driver Profile